DIY Glass Coasters: Easy and Creative Craft Project!


DIY glass coasters: easy and creative craft project, perfect for summer holidays!


Hello, fellow craft enthusiasts! Today, I am excited to share with you a fun and creative DIY project that we made during the beginning of school holidays last month.


Crafting with Clay:


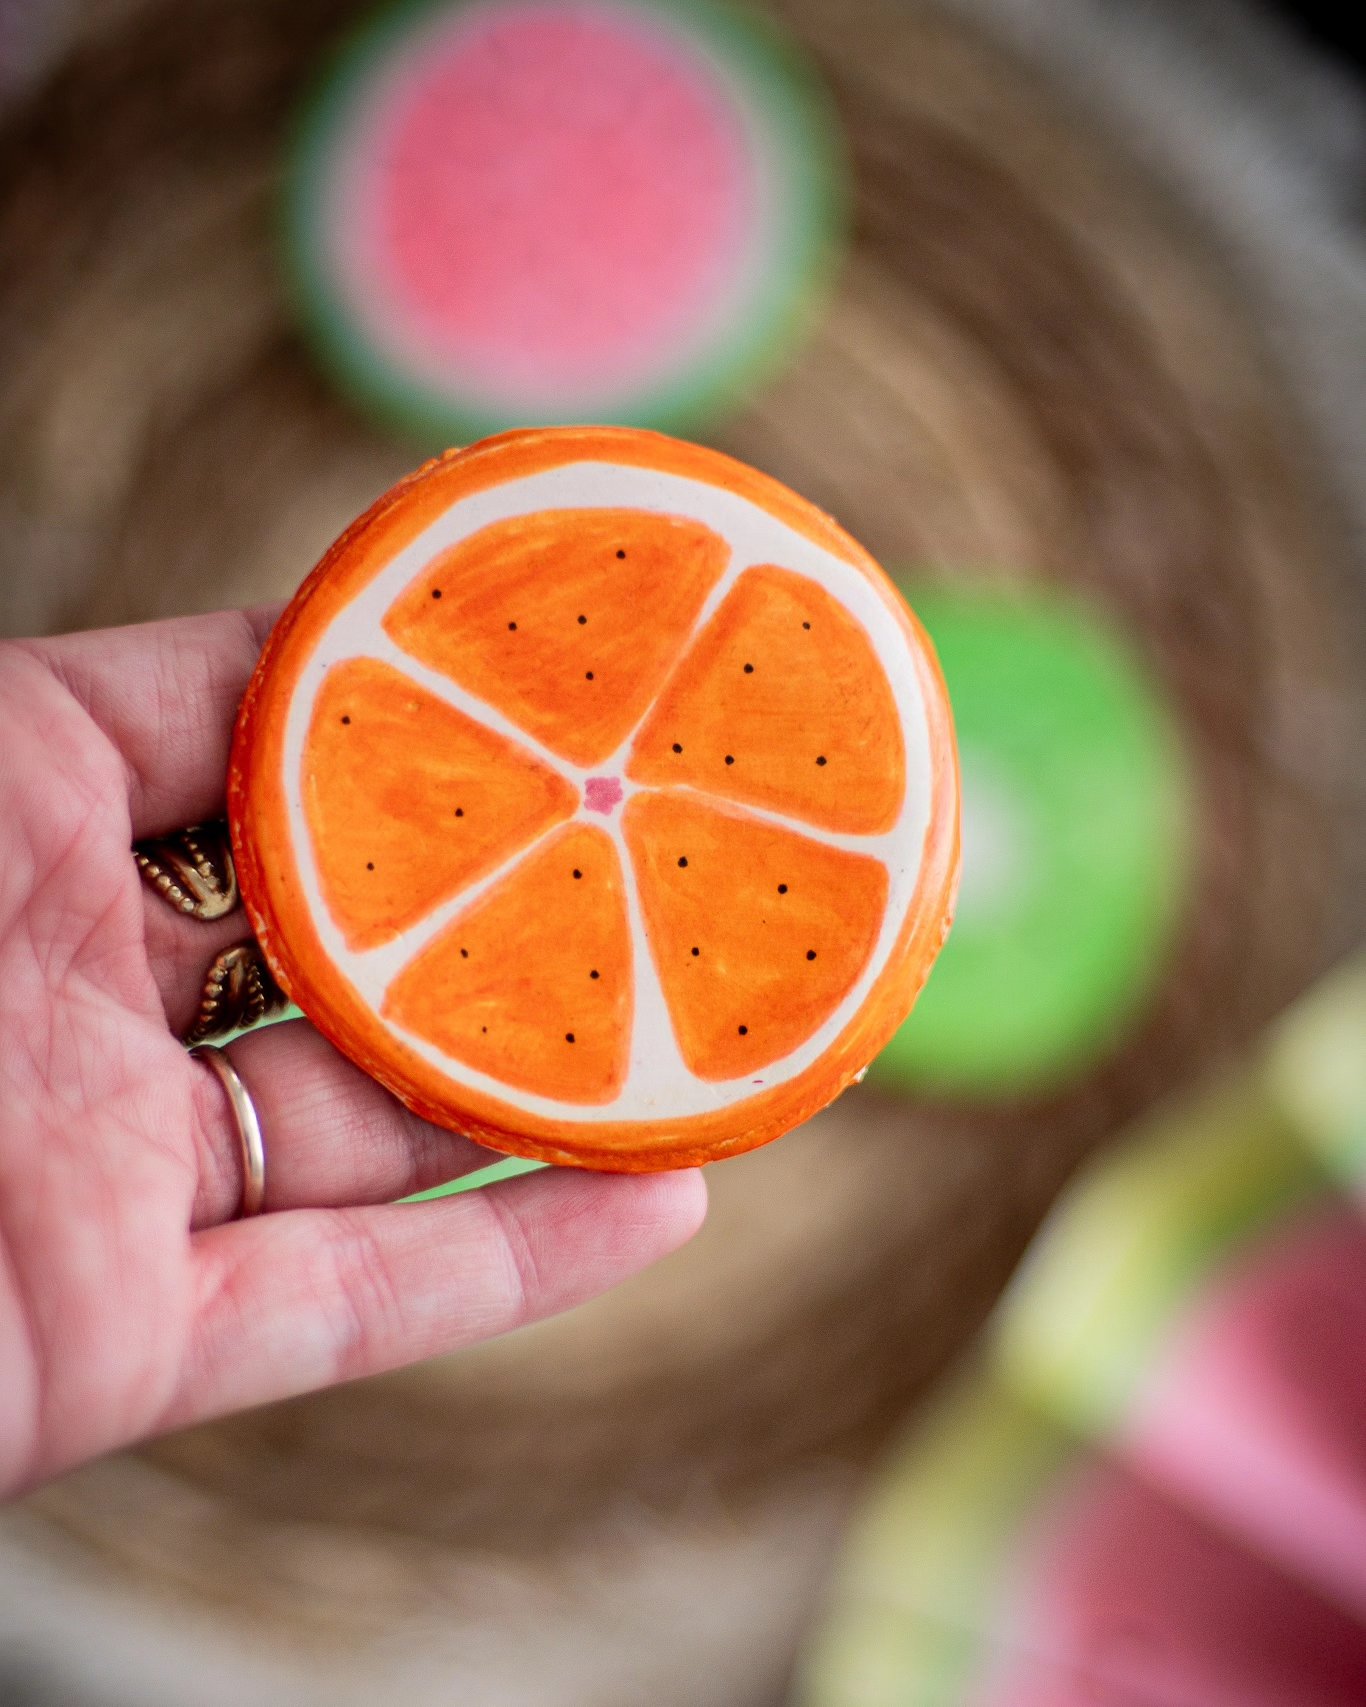
Last month, I had the pleasure of modeling these stunning glass coasters with the help of a simple yet versatile material – white air-dry clay. Using an ordinary glass as a mold, I created these beautiful coasters that turned out to be both functional and aesthetically pleasing.


Step-by-Step Guide:


1. Gather Your Materials: All you need for this project is white air-dry clay and some clean glasses or cups that you can use as molds.

2. Mold the Coasters: Take a portion of the air-dry clay and flatten it to the desired thickness. Gently press the glass onto the clay to create the coaster shape. Make sure to smooth out any rough edges for a clean finish.

3. Get Creative: Once you’ve molded the coasters, it’s time to let your creativity shine! You can use various techniques to decorate the coasters – from simple patterns to intricate designs. Acrylic paints work wonderfully on air-dry clay, giving you a wide array of colors to choose from.

4. Varnishing: To protect your artwork and make the coasters more durable, apply a layer of varnish after the paint has dried. This step also gives the coasters a glossy finish, making them look even more professional.

*The Temptation to Create More:*
After completing my first set of coasters, I must confess I’m now seriously tempted to make more. The whole process was so enjoyable and rewarding that I can’t wait to experiment with different designs and color combinations.


*Personal Favorites:*
As for my personal favorite, I have to go with the charming watermelon design. Its vibrant colors and playful pattern never fail to put a smile on my face, making it a wonderful addition to any table setting.


Conclusion:


In conclusion, this DIY craft project has proven to be a delightful and easy way to create functional and stylish glass coasters. With just a few simple materials, you can unlock your creativity and produce beautiful pieces of art that are also practical for everyday use.

So, why not give it a try? Whether you’re a seasoned crafter or just starting with DIY projects, making these glass coasters will surely spark joy and satisfaction. Happy crafting! ??

*Note:*
Remember to keep an eye on your little ones while working with air-dry clay and avoid using any toxic substances in your crafting materials to ensure safety.

Subscribe to my newsletter so you don’t miss any free printable and other monthly tips and inspiration.
Find my DIY ideas and crafts classed by themes on my “about me” page
https://test.scrapsandcoffeegrounds.coma-propos/?preview=true&preview_id=1&preview_nonce=b6a95f434e&frame-nonce=d2ac28a990&=1
Follow for more on my Instagram https://instagram.com/scraps.and.coffee.grounds?utm_medium=copy_link
Check my YouTube channel if you prefer: https://youtube.com/@scraps.and.coffee.grounds
And you can support my work https://ko-fi.com/scrapsandcoffeegrounds

DIY playdough ice-creams!

Sweet Summer Fun: DIY Playdough Ice-Creams!


Summer days call for creative activities that keep the kids entertained while beating the heat. As a parent, I’m always on the lookout for fun and eco-friendly ways to engage my children’s imagination. Recently, I stumbled upon a brilliant idea that combined recycling, art, and play into one delightful activity: DIY Playdough Ice-Creams! ??

Ice-cream Play-Doh Creation


The Plan


With some old cardboard, recycled pencil and color scraps, and a bunch of colorful playdough, I set the stage for an afternoon filled with icy-cold creativity. The mission was clear: to let the girls design and construct their dream ice-cream treats using their imagination and artistic skills.

Step 1: Recycling Fun

To kick off our ice-cream adventure, we gathered a sturdy cardboard box that was destined for the recycling bin. Instead of letting it go to waste, I transformed it into the canvas for our playdough masterpiece. With a little imagination and a few strokes of a marker, I sketched delightful cupcakes and ice creams that would serve as the templates for the girls’ creations.

Step 2: The Playdough Palette

With our canvas ready, it was time to set up the playdough station. I brought out different colors of playdough, each representing a delicious flavor, from classic vanilla to exotic blueberry swirl. The girls’ eyes lit up with excitement as they saw the rainbow of possibilities before them.

Step 3: Unleashing Imagination

With the canvas and playdough in place, it was time to let the girls take charge. They each grabbed a handful of playdough and started molding, rolling, and shaping their custom ice-cream cones and cups. Their creativity knew no bounds as they crafted unique combinations of flavors and designs. From double scoops of mint-chocolate chip to fanciful rainbow swirls, their ice creams were pure works of art!

Step 4: Sprinkle Magic

What’s an ice-cream without sprinkles? To add an extra touch of fun and eco-consciousness, we got crafty with recycled pencil and color scraps. We cut them into tiny pieces and voilà, we had our very own sprinkles! The girls playfully decorated their ice-cream masterpieces with these faux sprinkles, adding an extra layer of charm to their creations.

If you want to give it a try and need a template, you can download that printable for free:


Result: Sweet Success!


The girls were completely engrossed in their ice-cream-making adventure. Time flew by, and before we knew it, we had a table full of playdough ice creams, each one a unique representation of the girls’ imaginations. Their laughter and smiles were infectious, making it a memorable summer afternoon for all of us.

Beyond Fun: Valuable Lessons

As parents, we always strive to impart valuable life lessons to our children. With this activity, we managed to blend fun with environmental consciousness. The girls learned about the significance of recycling and reusing materials, making them more aware of their impact on the planet.

Playdough compositions


Conclusion


If you’re looking for an engaging, eco-friendly, and imaginative summer activity for your kids, look no further than DIY Playdough Ice-Creams! This creative journey provided us with quality time, a lot of laughter, and beautiful memories. So, next time the scorching summer sun keeps you indoors, gather some playdough, recycled materials, and let your kids’ imaginations run wild with their very own Playdough Ice-Creams! ??

Remember, the best summer moments are often found in the simplest of activities! ??

Ghost shaped brownies

Easy Ghost-Shaped Brownies: A Spooky and Healthy Treat!


Halloween is just around the corner, and what better way to celebrate than with some delicious and healthy ghost-shaped brownies! These adorable treats are not only visually appealing but also easy to make and perfect for kids and adults alike. In this blog post, we’ll show you a step-by-step guide to creating these delightful ghost-shaped brownies using a plant-based, sugar-free, and kid-friendly recipe.

Ghost shaped brownies

Ingredients:


– 1 batch of your favorite plant-based brownies (You can find my sweet potato brownie recipe on the blog here
– Ground almonds or coconut flakes (for that ghostly white appearance)

Instructions:

1. Bake the Brownies:
Prepare a batch of your favorite plant-based brownies using the sweet potato brownie recipe from the blog. This recipe ensures that your brownies are not only delicious but also healthier as they are sugar-free. This means no sugar rush for your kids, making them perfect for Halloween celebrations.

2. Cool and Cut the Brownies:
Once your brownies are out of the oven, let them cool completely. Once cooled, carefully remove the brownie from the baking dish and place it on a clean surface. Using a sharp knife, cut the brownie in half, creating two semi-circles that resemble the Yin-Yang symbol.

3. Ghostly Shapes:
Take one of the semi-circles and, using your imagination, cut out the shape of a cute ghost. You can create a simple ghost silhouette by cutting out a rounded head and a flowing body. Repeat the same process with the other semi-circle.

4. Almond or Coconut Coating:
To give your ghost-shaped brownies that spooky white appearance, we have two options: ground almonds or coconut flakes. For the almond coating, place some almonds in a food processor and pulse until you have fine grounds. For the coconut coating, you can use shredded coconut or pulse desiccated coconut to achieve the desired consistency.

5. Decorate:
Now comes the fun part! Take each ghost-shaped brownie and gently press it into the ground almonds or coconut flakes, coating the surface entirely. The almond or coconut will stick to the brownie, creating a ghostly white appearance.

Your ghosts are ready!


Congratulations! You’ve just made some spooktacular and healthy ghost-shaped brownies that your kids will love. These adorable treats are perfect for Halloween parties, school events, or simply as a delightful surprise for your loved ones. The plant-based, sugar-free aspect ensures that they are a healthier alternative to traditional brownies, making them a guilt-free indulgence.

Remember to check out my blog for more delicious and healthy recipes like this one, and be sure to explore my guides for additional culinary inspiration. Enjoy the festivities and have a hauntingly happy Halloween! ??

DIY pallet outdoor lounge

Title: DIY Pallet Outdoor Lounge: Our Biggest and Most Rewarding DIY Project!

Recycling and repurposing pallets have become a creative trend for DIY enthusiasts worldwide. At our home, the idea of crafting an outdoor lounge from reclaimed pallets had been lingering for a while. Finally, we decided to take on this ambitious project, but little did we know that it would turn into a challenging and rewarding journey. In this blog post, we want to share our experiences and the valuable lessons we learned while creating our DIY pallet outdoor lounge.

Diy pallet outdoor lounge

The Genesis of the Idea:

The concept of building an outdoor lounge from pallets sparked our interest because it perfectly aligned with our passion for sustainability and eco-friendly practices. We envisioned a cozy space where we could unwind and connect with nature, all while giving a new life to discarded materials.

Diy pallet outdoor lounge decor

Challenges and Improvisation:

As with any DIY project, we encountered numerous challenges along the way. The biggest hurdle was our busy schedules – juggling work and school made it difficult to dedicate consistent time to the project. Consequently, it stretched the timeline to nearly a year. Nevertheless, we persevered, embracing every opportunity to work on the lounge.

Weather became another formidable adversary during the winter months. Rain and humidity made painting the pallets a real struggle. We had to adapt our plans, finding suitable windows of dry weather and creating temporary coverings to shield the wood from moisture.

The Building Process:

To construct our pallet outdoor lounge, we procured four pallets for the seating area and ingeniously utilized eight pallets to form the “walls.” These walls not only provided privacy but also served as a vertical garden by adding pot flowers to create a lush and inviting ambiance.

Throughout the project, we improvised and learned to make the most out of the materials we had. From sanding the rough edges to carefully assembling the pallets, each step required careful attention to detail. Despite the challenges, this process allowed us to develop our problem-solving skills and strengthen our bond as a team.

Cat on a pallet outdoor lounge

The Joy of Completion:

After countless hours of hard work and determination, the day finally arrived when we could admire our finished pallet outdoor lounge. The sense of accomplishment was overwhelming, knowing that we had transformed discarded pallets into a functional and beautiful outdoor space.

The lounge quickly became our favorite spot to relax, read, and entertain guests. Its rustic charm and eco-conscious design garnered admiration from friends and family, motivating them to embark on their DIY ventures.

Garland

Lessons Learned:

Our DIY pallet outdoor lounge taught us valuable lessons about patience, perseverance, and creativity. We discovered that with dedication and the right attitude, we could overcome any obstacle, no matter how challenging. Moreover, it reinforced our belief in the significance of sustainable practices and the magic of breathing new life into old materials.

See what it looks like on that video:

Watch the video featuring the pallet lounge!

Conclusion

Creating our DIY pallet outdoor lounge was an incredible journey filled with ups and downs. From battling weather conditions to managing time constraints, we embraced the process and emerged victorious. This project not only provided us with a beautiful space to cherish but also instilled in us a profound sense of achievement and pride. We hope our experience inspires others to embark on their DIY adventures, promoting recycling and sustainability while discovering the joy of turning discarded materials into cherished treasures. Happy DIYing!

Subscribe to my newsletter so you don’t miss any free printable and other monthly tips and inspiration.
Find my DIY ideas and crafts classed by themes on my “about me” page
https://test.scrapsandcoffeegrounds.coma-propos/?preview=true&preview_id=1&preview_nonce=b6a95f434e&frame-nonce=d2ac28a990&=1
Follow for more on my Instagram https://instagram.com/scraps.and.coffee.grounds?utm_medium=copy_link
Check my YouTube channel if you prefer: https://youtube.com/@scraps.and.coffee.grounds
And you can support my work https://ko-fi.com/scrapsandcoffeegrounds

Diy paper fans

DIY Paper Fans with a Watercolor Watermelon Pattern: Simple and Refreshing!


As the scorching heat of summer settles in, we all crave some refreshing ways to beat it. What better way to keep cool than by creating your own delightful DIY paper fans? In this blog post, I’ll guide you through a simple yet charming project that involves making paper fans with a watercolor watermelon pattern. With just A4 paper sheets and a couple of wooden sticks from popsicles, you’ll be able to create a fun and functional accessory that will add a touch of coolness to your summer days.

Materials Needed:

  1. A4 paper sheets (preferably white)
  2. Watercolor paints in shades of green, pink, and black
  3. Paintbrushes
  4. Two wooden sticks (popsicle sticks)
  5. Scissors
  6. Glue
  7. Pencil
  8. Ruler

Instructions:

Step 1: Creating the Watercolor Watermelon Pattern
Take an A4 paper sheet and sketch a watermelon pattern lightly using a pencil. Divide the paper into two sections, with the bottom section being larger to represent the watermelon fruit. Fill the larger section with a vibrant pink watercolor wash, while the top section should be painted with a soft green shade to depict the watermelon rind. Allow the paint to dry completely.

Step 2: Adding Details
Once the base colors have dried, use a thin brush and black watercolor paint to add watermelon seeds to the pink section of the pattern. The seeds can be irregularly shaped and placed at random to give a natural look.

Step 3: Folding the Paper Fan
Take the painted paper sheet and fold it accordion-style, with each fold approximately 1 inch wide. Alternate between folding towards you and away from you until the entire sheet is folded.

Step 4: Attaching the Sticks
Unfold the accordion-folded paper slightly and apply a thin line of glue along one of the folds. Place one end of a wooden stick on the glued section and press it firmly. Repeat the same process with the other wooden stick, ensuring they are aligned and parallel.

Step 5: Completing the Fan
Once the glue has dried, fold the fan back together accordion-style. Secure the folded fan with a rubber band or ribbon at the base of the wooden sticks. Trim the ends of the paper if necessary to ensure a clean finish.

Why do you need to try that Craft?


With a few simple materials and a touch of creativity, you can transform plain A4 paper sheets into charming watercolor watermelon patterned fans. These DIY paper fans are not only a fun craft project but also serve as practical accessories to keep you cool during hot summer days. So, grab your supplies and get ready to beat the heat in style with your homemade paper fans!

Subscribe to my newsletter so you don’t miss any free printable and other monthly tips and inspiration.
Find my DIY ideas and crafts classed by themes on my “about me” page
https://test.scrapsandcoffeegrounds.coma-propos/?preview=true&preview_id=1&preview_nonce=b6a95f434e&frame-nonce=d2ac28a990&=1
Follow for more on my Instagram https://instagram.com/scraps.and.coffee.grounds?utm_medium=copy_link
Check my YouTube channel if you prefer: https://youtube.com/@scraps.and.coffee.grounds
And you can support my work https://ko-fi.com/scrapsandcoffeegrounds

DIY pirate themed birthday party

DIY pirate themed birthday party: our last handmade birthday is here! Find out these easy ideas to create your little one’s birthday party plus free printables for it!


Ahoy, matey! If you’re looking to host a swashbuckling celebration for your little buccaneer, a pirate-themed birthday party is the way to go. With a few easy-to-make decorations, delicious treats, and free printables, you can create a memorable adventure for all the young scallywags. So, grab your eyepatch and join me on this exciting journey as we plan the ultimate pirate party!

Easy ideas to create your pirate birthday party

?Invitations:
Set the tone for the adventure by sending out pirate-themed invitations. You can find free printables online or get creative and make your own. Include details such as the party date, time, location, and a request for guests to come dressed as pirates. Don’t forget to mention that there will be hidden treasures to be discovered!

DIY pirate themed birthday party

?Pirate Honor Serment:
Kick off the party with a special pirate oath or honor serment. Create a printable sheet with the oath, including promises to be brave, share the loot, and respect fellow pirates. Have the little pirates recite the oath together, creating a sense of camaraderie and setting the adventurous atmosphere.

?Printables for Favor Gifts:
Provide your young crew with loot bags filled with goodies. Find free printable tags or labels online and attach them to small favor bags. Fill these bags with pirate-themed trinkets like eye patches, gold coins, temporary tattoos, and plastic swords.

Pirate favors

Easy Handmade Decorations:


Transform your party space into a pirate’s cove with these simple and budget-friendly decorations:

?Octopus Sausages: Cut hot dog sausages into strips, leaving a bulbous shape at the top. When you cook them, the tentacles will curl, resembling octopus arms.

?Watermelon Ship Cakes: Carve small watermelons into boat shapes and decorate them with sails made from colored paper. Insert skewers into the watermelon to hold the sails in place. These fruity delights will be a hit with the crew.

Watermelon ship
Cake ship birthday cake

?Maltesers as Cannonballs: Fill a glass jar or bowl with Maltesers (malted chocolate balls) and label it as “Cannonballs.” It adds a fun touch to the party table.

?Crocodile Gummies: Serve green gummy candies shaped like crocodiles as a nod to the dangerous creatures that pirates encounter on their adventures.

Table display

?Little Boats Cookies: Bake cookies in the shape of boats using a boat-shaped cookie cutter. Decorate them with colored icing or edible markers to resemble pirate ships.

Boats cookies

?Egg Box Treasure Hunt:
Create an exciting treasure hunt using egg cartons and small treasures. Hide various items such as plastic gold coins, beads, and trinkets in each compartment of the egg cartons. Number the cartons and hide them around the party area. Provide the young pirates with clues to find the cartons and collect their loot.

Eggbox treasure

?Toilet Paper Roll Parrots:
Transform plain toilet paper rolls into vibrant parrots. Paint the rolls in bright colors, add googly eyes, and attach colored paper wings and beaks. These adorable parrots can serve as table centerpieces or party favors.

Cardboard parrot

?Paper Pirate Hats:
No pirate party is complete without pirate hats! Create simple paper pirate hats using black construction paper or cardstock. Add white skull and crossbones symbols or personalized decorations. Let the young pirates wear their hats throughout the party and take them home as souvenirs.

Pirate hats

?Pirate brew: I just added food coloring to the water and recycled a beautiful bottle for it.

Pirate brew

?Cardboard 7 number: I just used a package box to create a seven and glued a pirate hat on it??

Number seven cardboard

Treasure hunt map pizza: probably my favorite! It’s so easy and the result is really fun!

Map shaped pizza

That’s a wrap! You can now make an eco-friendly party ?


With these DIY ideas, you can throw a memorable plastic-free pirate-themed birthday party that will have your young crew feeling like true buccaneers. From the moment they receive their pirate-themed invitations to the final “Ahoy, mateys!” as they depart, this adventure-filled celebration is sure to make a lasting impression. So, set sail on the high seas of imagination and create a swashbuckling event that will be cherished for years to come!

Subscribe to my newsletter and get your free “Sugar-free unique cakes guide” and so you don’t miss any free printable and other monthly tips and inspiration.
Find my DIY ideas and crafts classed by themes on my “about me” page
https://test.scrapsandcoffeegrounds.coma-propos/?preview=true&preview_id=1&preview_nonce=b6a95f434e&frame-nonce=d2ac28a990&=1
Follow for more on my Instagram https://instagram.com/scraps.and.coffee.grounds?utm_medium=copy_link
Check my YouTube channel if you prefer: https://youtube.com/@scraps.and.coffee.grounds
And you can support my work https://ko-fi.com/scrapsandcoffeegrounds

Homemade seed crackers recipe

? Homemade Seed Crackers Recipe : today I want to share with you that easy recipe to make your own crackers, healthy and waste!

Looking for a delicious and nutritious snack?
Try out these homemade seed crackers packed with the goodness of chia, sunflower, and pumpkin seeds. They’re simple to make and bursting with flavor.

Flatlay with fruits and crackers

Here’s the recipe:


Ingredients:


– 1 cup chia, sunflower, and pumpkin seeds (mixed)
– 1 cup cornstarch
– 1 cup boiled water


Instructions:


1. Preheat your oven to 180°C (350°F).
2. In a mixing bowl, combine the chia, sunflower, and pumpkin seeds along with the cornstarch.
3. Add the boiled water to the mixture and stir well until all the ingredients are thoroughly combined. Let the mixture sit for about 5 minutes to allow the chia seeds to absorb the water and bind the mixture together.
4. Line a baking sheet
5. Transfer the mixture onto the prepared baking sheet and spread it out evenly, pressing it down with the back of a spoon. You can adjust the thickness according to your preference.
6. Place the baking sheet in the preheated oven and bake for approximately 15 minutes or until the crackers turn golden brown and crisp.
7. Once baked, remove the baking sheet from the oven and let the crackers cool completely.
8. Break the crackers into desired shapes and sizes.
9. Enjoy your homemade seed crackers as a tasty and healthy snack on their own or pair them with your favorite dips and spreads!


? Get creative and experiment with different herbs and spices to add more flavor to your crackers. They’re perfect for satisfying those crunchy cravings while keeping things wholesome! ?

Would you try that recipe?

Subscribe to my newsletter to get your free guide with unique and Sugar-free cakes!

Don’t miss any free printable and other monthly tips and inspiration.
Find my DIY ideas and crafts classed by themes on my “about me” page
https://test.scrapsandcoffeegrounds.coma-propos/?preview=true&preview_id=1&preview_nonce=b6a95f434e&frame-nonce=d2ac28a990&=1
Follow for more on my Instagram https://instagram.com/scraps.and.coffee.grounds?utm_medium=copy_link
Check my YouTube channel if you prefer: https://youtube.com/@scraps.and.coffee.grounds
And you can support my work https://ko-fi.com/scrapsandcoffeegrounds

DIY scratch art paper

DIY scratch art paper: find you throw we made our own scratch art paper! It’s so easy!

Girl holding a scratch art paper

Celebrating Bastille Day with Scratch Art Paper! ?

Join us as we kick off the festivities for Bastille Day, also known as the 14th of July, right here in France! Today, I am going to show you how to make your very own scratch art paper, and how we drew fireworks to honor this special occasion.
Let’s get started!


Materials you’ll need:


– Heavyweight paper or cardstock
– Crayons (preferably bright colors)
– Black tempera or acrylic paint
– Dish soap
– Paintbrush
– Toothpicks or a wooden stylus
– Optional: colored pencils or markers for additional details


Instructions:


1. Start by coloring the entire surface of your paper with crayons. Choose vibrant colors that will contrast nicely with the black paint.
2. In a small container, mix a small amount of black tempera or acrylic paint with a few drops of dish soap. The dish soap will help the paint adhere to the crayon surface.
3. Using a paintbrush, apply the black paint mixture evenly over the colored surface. Allow it to dry completely.
4. Once the paint is dry, you can start creating your fireworks! Take a toothpick or wooden stylus and carefully scratch away the black paint to reveal the colorful crayon underneath. Experiment with different scratching techniques to create various fireworks shapes and patterns.
5. Feel free to add additional details to your fireworks using colored pencils or markers. This step is optional but can make your artwork even more vibrant and dynamic.
6. Voilà! Your scratch art paper with fireworks is complete, you can now celebrate Bastille Day in style! ?


Remember, Bastille Day is a significant event in French history, commemorating the storming of the Bastille prison on July 14, 1789. It symbolizes the birth of the modern French nation and the principles of liberty, equality, and fraternity.

? Happy Bastille Day! ?

Subscribe to my newsletter to get the “unique Sugar-free cakes”. Don’t miss any free printable and other monthly tips and inspiration.
Find my DIY ideas and crafts classed by themes on my “about me” page
https://test.scrapsandcoffeegrounds.coma-propos/?preview=true&preview_id=1&preview_nonce=b6a95f434e&frame-nonce=d2ac28a990&=1
Follow for more on my Instagram https://instagram.com/scraps.and.coffee.grounds?utm_medium=copy_link
Check my YouTube channel if you prefer: https://youtube.com/@scraps.and.coffee.grounds
And you can support my work https://ko-fi.com/scrapsandcoffeegrounds

Fairy themed birthday party

Fairy themed birthday party: last year we celebrated Our Girl’s 6th Birthday, she asked for a fairy table, so today I am sharing with you the handmade ideas that I used.

Diy fairy themed birthday party


Every child’s birthday is a special occasion that calls for creativity and magic. For our daughter’s 6th birthday, we decided to create an enchanting fairy-themed celebration. With a touch of imagination and a dash of DIY, we transformed our rental studio into a whimsical fairyland. In this blog post, I’ll share some of the delightful ideas I incorporated to bring the fairy theme to life.

Handmade fairy decorations


1. Upcycled Piñata from a Paper Lantern:
To kick off the festivities, I crafted a unique and eco-friendly piñata using a paper lantern. By applying colorful butterflies and decorating it with fake ivy and  fairy-themed cutouts, I turned a simple lantern into a captivating centerpiece that would make any fairy proud.

Homemade piñata


2. Paper Ivy Leaves and No-Sew Dress with Knot Tul:
To add an ethereal touch to the decorations, we made paper ivy leaves to hang around the party area. The lush green leaves added a natural element and transformed the space into a magical forest. Additionally, I created a no-sew dress for our daughter using a soft fabric and tying a knot at the top, creating a beautiful tul-like effect. The dress perfectly matched the fairy theme and made our little girl feel like a true woodland princess.

Handmade fairy costume


3. Fairy Wreaths with Paper Flowers and Fake Ivy:
We wanted every guest to feel like they were stepping into a fairy realm, so we provided fairy wreaths for our 2 girls to wear. Using paper flowers, fake ivy, and colorful ribbons, we assembled enchanting wreaths that added an extra touch of magic to the celebration. The children were delighted to wear their wreaths and fully immerse themselves in the fairy experience.


4. Watermelon Cake and butterfly-Shaped Cheese:
No birthday celebration is complete without a delicious cake. To stay in line with the fairy theme, we created a watermelon cake adorned with fresh berries and edible flowers. Its vibrant colors and refreshing taste were a hit among the kids. We also served star-shaped cheese, specifically Babybel, to keep with the magical atmosphere and provide a whimsical snack for the little fairies in attendance.

Fairy themed birthday party
? birthday snacks


5. Babybel Ladybugs and Recycled “Caught a Fairy” Jars:
Continuing with the theme, we crafted adorable Babybel ladybugs by attaching black olives to red Babybel cheese wheels. These bite-sized treats were not only visually appealing but also delicious and easy to prepare. Additionally, we prepared recycled “Caught a Fairy” jars by repurposing glass jars, decorating them with glitter, and filling them with fairy-themed trinkets. Each child took home a personalized jar as a memento from the enchanting party.

Babybel ladybugs
Fairy jar


6. Fresh Fruit Brochettes and Pretzel Butterflies:
To ensure a balanced and healthy treat option, we prepared fresh fruit brochettes. Skewering bite-sized pieces of colorful fruits like strawberries, melon, and pineapple created a vibrant and visually pleasing snack for the fairy guests. As an extra touch, we made pretzel butterflies by attaching wings made from colored candy melts to pretzel twists. These sweet and salty treats were adored by both kids and adults.

Butterfly shaped bretzels
Fresh fruits brochettes

7. Fairy dust bottles and fairy sticks: upcycles a bottle and put some sand inside, your dust is readyady!

Our favorite party ideas!


Our fairy-themed birthday party was a magical experience that brought smiles to everyone’s faces. By incorporating DIY elements such as the upcycled piñata, paper ivy leaves, fairy wreaths, and creative food ideas, we transformed our holiday studio into an enchanted forest. It was a joyous celebration where imaginations ran wild and fairy wings fluttered. We hope these ideas inspire you to create your own magical celebration for your child’s next birthday!

Subscribe to my newsletter so you don’t miss any free printable and other monthly tips and inspiration.
Find my DIY ideas and crafts classed by themes on my “about me” page
https://test.scrapsandcoffeegrounds.coma-propos/?preview=true&preview_id=1&preview_nonce=b6a95f434e&frame-nonce=d2ac28a990&=1
Follow for more on my Instagram https://instagram.com/scraps.and.coffee.grounds?utm_medium=copy_link
Check my YouTube channel if you prefer: https://youtube.com/@scraps.and.coffee.grounds
And you can support my work https://ko-fi.com/scrapsandcoffeegrounds

Upcycled necklace organizers

? Upcycled necklace organizers ?? Transforming Wooden Hangers into Stunning Necklace Organizers with a Rustic Twist! ??

Are you ready to embark on a journey of creativity and sustainability? Let’s dive into the world of upcycling as we repurpose old wooden hangers into charming necklace organizers. With just a hammer and nails, we’ll create a rustic masterpiece that adds a touch of nature to your jewelry display. Let’s get our hands dirty and bring these wooden hangers back to life! ??

Imagine strolling through a serene forest, surrounded by towering trees and the soothing sound of rustling leaves. Now, we’ll bring that essence into our homes with our upcycled wooden hanger project.

Upcycled necklace organizers and side table decor


Step by step instructions:


Step 1??: Begin by selecting a few wooden hangers that have lost their purpose but still carry a story within their grains. Embrace their imperfections; they add character to our creation.

Step 2??: Take a moment to connect with the wood. Smooth its rough edges with sandpaper, as if polishing away the worries of the past. Feel the texture beneath your fingertips, appreciating the natural beauty that lies within.

Step 3??: Now, envision the branches of a tree extending outward, gracefully holding the treasures of nature. Let’s mimic this elegant display by attaching decorative hooks to the wooden hangers. With each tap of the hammer, we merge the elements of wood and metal, forming a harmonious union.

Step 4??: As we attach the hooks, we can almost hear the whispers of the forest, applauding our commitment to sustainable living. The hangers, once forgotten, now stand tall, proudly showcasing their new purpose.

Step 5??: Place your upcycled necklace organizers on a wall or inside your closet, and witness the magic unfold. Adorn them with your favorite necklaces, watching as they drape delicately like vines upon a mighty oak.

Step 6??: Every time you admire your rustic necklace organizers, remember the transformative power of upcycling. You have breathed new life into forgotten materials, preserving the essence of nature and reducing waste.


Feel free to share your upcycled wooden hanger creations by tagging me or share toue thoughts in comments below!

#DIYProject #UpcyclingIdeas #SustainableLiving #ReduceReuseRecycle #NecklaceOrganization #CreativeCrafting #DoItYourself #NatureInspired #RusticCharm

Subscribe to my newsletter so you don’t miss any free printable and other monthly tips and inspiration.
Find my DIY ideas and crafts classed by themes on my “about me” page
https://test.scrapsandcoffeegrounds.coma-propos/?preview=true&preview_id=1&preview_nonce=b6a95f434e&frame-nonce=d2ac28a990&=1
Follow for more on my Instagram https://instagram.com/scraps.and.coffee.grounds?utm_medium=copy_link
Check my YouTube channel if you prefer: https://youtube.com/@scraps.and.coffee.grounds
And you can support my work https://ko-fi.com/scrapsandcoffeegrounds